LIGHT POLLUTION      - A guide for your personal campaign
Ottawa Skyline


Ottawa Right-of-way Lighting Policy


Ottawa Policy
Large cities are taking light pollution more seriously than in the past. As the above image shows, streetlights are not the only source of LP. However, Ottawa's policy is an important advance because it recognizes light pollution as a problem that must be reduced. The City is also leading the way by using less energy in nighttime lighting. The Ottawa Policy is not perfect but it has very important elements that will continue to reduce the light pollution per capita in the Nation's Capital.

You may download the document on the left by clicking on the image. Of particular importance are illumination levels that are 1/2 that of what most other cities use. This saves 50% of Ottawa's roadway lighting electricity consumption! And, the preferred fixture type is full cut-off. We would like to have seen fewer architectural light fixtures (attractive during the day but produce a lot of glare at night) and we would have preferred the semi cut-off fixtures (5% up-light) upgraded to cut-off (2.5% up-light) fixtures, or better yet, to full cut-off (0% up-light). However, it is still a leap forward in urban lighting policy and one that ushers in a more ecologically sound future.


Dark Sky Sites


"What is Light Pollution?"

CU Physics - SE


What has happened to the stars?
We can't get dark adapted.

Local Glare


Lots of light, but the road is still dark!
Where is the light? It's in glare and light trespass.

Light Trespass


A 150-watt night light so bedrooms are never dark.
There is no security at 2 am unless there is someone to watch out for vandals.

Eastern Horizon


Sky Glow!
It is hard to see the stars with the sky glow.

Light Pollution is the combined effect of glare, light trespass and sky glow. Although artificial lighting is used to increase visibility and safety at night, in many cases light pollution can actually reduce the safety and security it is intended to provide. The main culprit is the light that is directed to where it was not intended.

Glare is the visual discomfort resulting from insufficiently shielded light sources in the field of view. The light source itself hinders a person's ability to see details not directly illuminated by the light. This degrades safety and security. One should see the hazards, not the light source.

There are at least two physiological problems with glare. Bright light that enters our eyes from the side, will cause our pupil to get smaller - letting in less light. And, our natural dark adaptation cannot occur. Thus, we will no longer be able to see into the less lighted areas. They will appear black. The affect on stargazers is to make the sky appear as though there are no stars!

Glare is also especially debilitating for adults over 40 years of age. As our eyes age, our pupils cannot open as large as they did in our youth. We become more dependant on the light that passes through the centre of our lenses. Unfortunately, this area is where cataracts begin to grow. Thus senior citizens find it increasingly difficult to see well. For them, more light actually reduces visibility.

Light Trespass is misdirected light that invades neighbouring property. It creates a nuisance by shining into bedroom windows and other areas. Light should be directed to where it is needed and should not shine across neighbouring properties. Neighbours have arguments about lights left on all night that shine across the property of others. A simple shield on the offending light can solve the problem (see below).

We could also question the use of these all-night lights. If the owners have gone to bed, the only use for the light is to help vandals and others see their targets. A waving flashlight in the middle of the night is more suspicious than a constant floodlight.

A badly lighted commercial property adjacent to a residential area can lower the value of the homes because of the flood lighting that overwhelms the more subdued and tasteful lighting of a suburb.

Sky Glow is produced by two phenomena - one natural and one that is not. Natural sky glow is produced at night by emissions from gases high in our atmosphere. We can't do anything about that, but then it is so faint that most people never notice it. Artificial sky glow dominates the natural form in and around urban areas. It is caused by light that is scattered off dust and large air molecules around a city. This light was intended to illuminate the ground but, due to poor design, it is misdirected upward into the sky. It wastes energy and it obliterates the view of the natural night sky.


Light pollution is more than just a nuiscence for stargazers and astronomers. Without the contrast between the day and a dark night, our health can be compromised as well. Thirty years ago we were unaware of this problem. But now there is no excuse. Light pollution is a problem, and we must reduce it. Fortunately, the solutions are inexpensive and readily available.

Thirty years ago we were coping with the expensive solutions to air and water pollution. In the twenty-first century we are already tackling light pollution. Our children and grandchildren will thank us.


Coach Lights - SE


Road-side Glare!
Is this an inviting entrance?
The glare from these coach lights prevents us from seeing beyond the immediate area. This setup uses 1/3 kw of electricity - all night long, yet it is impossible to see up the laneway. These lights also make it impossible to see further down the road thus producing a safety hazard.

How could this be improved? The owner could reduce the wattage of the lights in the fixtures. Raise the level of the lights to the top half of the fixture and add an aluminum foil internal shield to the top half to prevent the direct view of the bulbs. (The aluminum will ensure the shield is almost invisible during the day.) If the owner wants these fixtures to be simple marker lights, then he should use a single bulb (15-w incandescent) in each fixture with a frosted glass window to diffuse the glare a bit.

As more people move out into the country, they bring urban lighting with them. Rural light pollution is changing the countryside. It is no longer a matter of getting out of the city to find dark skies. Accessible areas usually have glare and light trespass from private homes. If you live in the country, please shield your lights. Even a door light that shines out on to a rural road affects wildlife and reduces visibility for motorists and people out on a stroll.


Shoreline Glare


Shoreline Glare - hazard to boaters.


Shoreline glare prevents our eyes from adapting to the dark. The pilot of a boat cannot see channel markers or hazards floating in the channel.

These lights also affect the aquatic environment, forcing creatures that prefer the dark into deeper waters and drawing to the surface those that prefer the light. It is never a good idea to change the natural environment - especially for something as self-centred as vanity lighting.


"Two Simple Light Shield Projects"

Light Shield


Light Shield for 13-watt CF Bulb

Light Distribution


Distribution of Light with a Bulb Shield. Centre is 2.5 times brighter than without shield. So, use a lower wattage bulb.

Light Distribution


Distribution of Light without a Bulb Shield.
Illumination seems fine but with considerable glare.
Light ShieldLight Shield


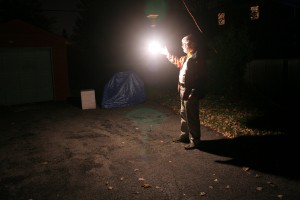
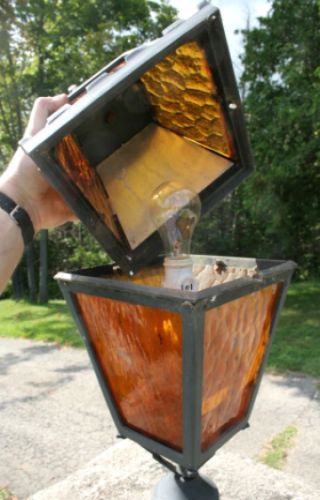
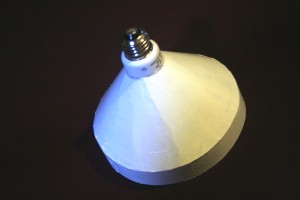
Shield with CFL Bulb in Place.                                              Illuminate the Steps for Safety.
                                                                                    (Picture shows a 15-watt incandescent bulb!)

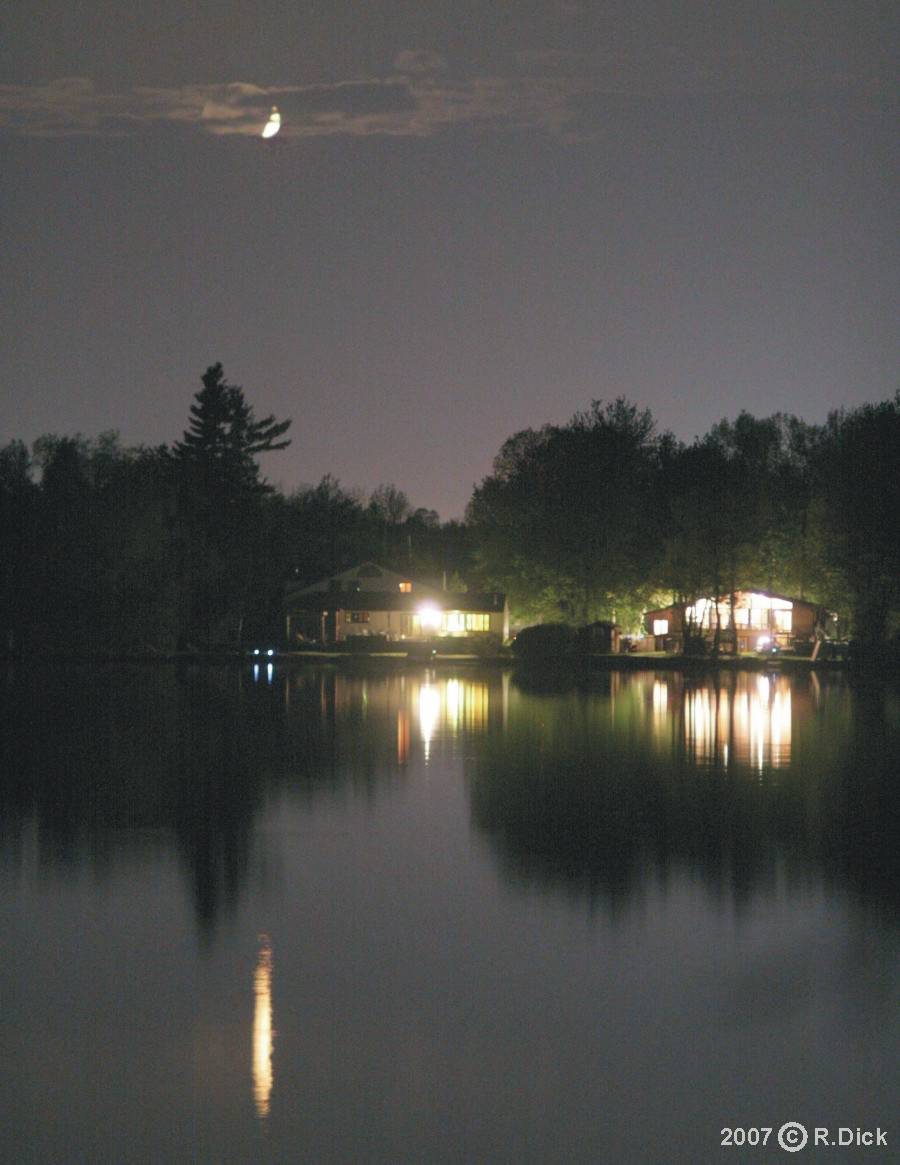
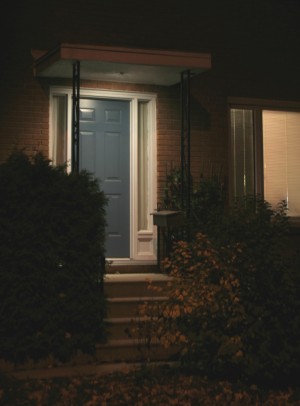
As a homeowner, you can reduce light pollution AND increase the safety of your home! You may also save some of that precious electricity.

Here is a simple little shield your kids can make. All you need is some cardboard, a ruler and scissors and a bit of outdoor paint. It will reduce glare onto the street and help visitors see your doorsteps. You may have to help them a bit with the painting at the end.

The Project
This light shield will fit a standard 13 watt Compact Fluorescent (CF) or LED light bulb.

WARNING: Don't try this with higher wattage incandescent bulbs. They can get very hot and may burn the cardboard - or more!

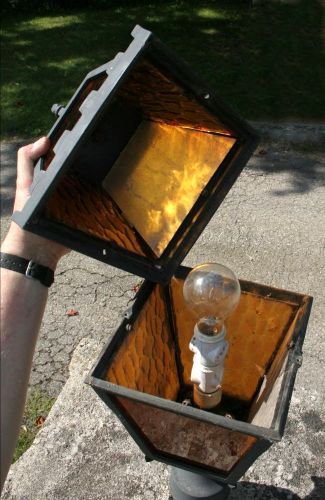
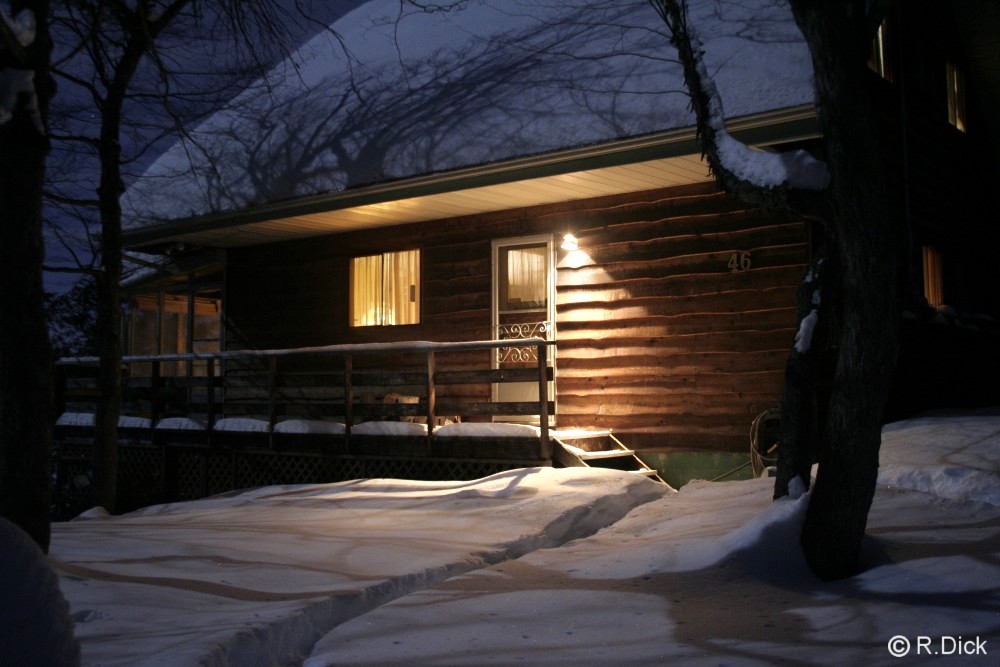
The shield fits over the bulb and will shield the light, preventing any light from shinning above the horizon. The light that is shielded, is reflected down onto the ground. Therefore instead of creating glare and wasting light, it improved visibility allowing the use of a lower wattage bulb. Thus saving energy. Cut out the "C" shaped paper pattern here. The central hole may be made smaller to accomodate smaller light bulbs.

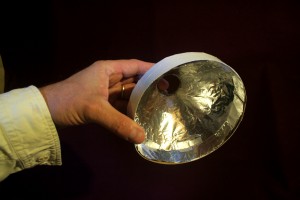
Get a piece of cardboard 8.5 x 11 inch. If you are careful, you will be able to cut all the cardboard pieces from a single 8.5 x 11 inch piece of cardboard. You can use the paper pattern to cut out the stiffening form from the cardboard. Use the paper pattern (or the cut-out cardboard) to cut thick alluminium foil from a roll.

Tape the cardboard into a cone and tape the strip of cardboard around the bottom edge of the cone. (This will both stiffen the cone's lower edge, and it will help shield the light.) See the image to the left. It may help make these instructions more clear.

Paint the inside and outside surfaces to protect the shield from moisture. I initially lined the inside with aluminum foil, but it had little effect and painting was easier. Slide it over the plastic portion of the 13-watt CF bulb. Tape it in place.

We think you will be surprised at how much better these bulbs work when they are shielded.

You can probably think of many variations on this design. Send them in, and we will post them. If you would like to make one for a larger CF bulb, the small central mounting hole will have to be made a bit larger, and the lower strip may have to be longer.

Variations:
If your fixture points the light upward, don't bother cutting out the small hole in the centre. To keep the shield from blowing away, tie a few short strings between the lower lip of the shield and the bottom of the light fixture.

If your fixture holds your bulb horizontally, you will have to cut the side out of the cone and hold the shield in place with those strings again. Tape will also work, but most consumer tapes will quickly degrade in the weather. Then you may have a "flying saucer"!

Coach Light Fixtures

Coach Lights are essentually architectual fixtures for marking the location of a laneway. They provide very poor ground illumination and considerable glare along the road. If marking your laneway is your goal, a low wattage bulb (15 watts) can be used. But we usually want the entrance road to be illuminated too. So how can we modify your existing fixture to minimize glare yet still shine sufficient light down onto your entrance?
COACH LIGHT


Typical Coach Light

Coach Fixtures are usually selected on what they look like in daylight. So any modifications should not be too visible during the day.

This model has coloured windows to reduce the glare from pure white light. Although red light is better for astronomers, neighbours may not like it. Amber is a good compromise.

Here is one way it can be done using a thin piece of aluminum and two extension light sockets.

Fix for Coach Light


Metal Shield in Top of Fixture

The metal shield is cut to fit behind each window in the top of your fixture. I suggest mounting it inside your fixture so that the modiciation is not apparent. Aluminum foil will work but it may have to be replaced each year as it gets weathered.

These shields (only one is shown in the picture) prevent light from shining directly into the eyes of motorists and pedestrians. The windows in the lower half of the fixture allow the light to shine down onto your laneway.

Fix for Coach Light


Socket Extensions Raise Bulb

The inexpensive coach lights have the light bulb near the bottom of the fixture. By raising the light bulb into the upper half of the fixture, the metal shields can be made to work much better. I suggest using two socket extensions from the electrical department of a hardware store. These will raise the bulb into the upper half of the fixture

If you don't need light shining to the side into the bushes, shield those lower windows as well. "The animals will love it if you do" (Paul Simon).

Now the light from the fixture will minimize glare along the road, it will illuminate your driveway and, the bulb will be easier to replace. The light that would otherwise shine into the sky is reflected down where it is needed. Without the glare, you may use a lower wattage bulb. The wattage you choose may depend on local lighting conditions. In the country, a 40-watt bulb per fixture is more than adequate, so why not try 25-watts.

If your coach light holds several light bulbs, why not just use one bulb and save on electricity and the cost of extra bulbs.

What can we do?

Shielded Door Light


Recessed Lighting Works Very Well
Shield our own outdoor lights.

Use motion detectors to trigger our all-night outdoor lighting.

Some cities light their streets to 1/2 the generally used illumination levels. Imagine, a city saving 1/2 their roadway lighting electricity costs! How is your city doing? Make them care!

Don't let developers or commercial interests push you, or your city around. They should shield their lights too.

Is there a dark park in your area? Perhaps it could be acclaimed as an Urban Star Park or Dark Sky Preserve. Speak to the park manager and show them the RASC Dark Sky Information. Make it happen.

Remember that some light is helpful, but too much creates problems.

Without someone to watch an illuminated property (security personnel), security lighting just attracts vandals.


Coach Lights - SE


Use the Architecture as a Shield.
You don't need to buy an expensive fixture to shield your lights. You can build an inexpensive one (above) or use what you have already.

Here is the door to my observatory. The overhang keeps the rain off as I fumble for my keys. (Yes, it actually rains at my observatory.) Because the bulb is shielded, I don't need a very bright light. This image shows how well a 15-w incandescent bulb can light the area around the door. It may not seem bright if you are use to reading the fine print of a legal document outdoors at 3a.m. but is quite bright enough to find your keys and see who may be visiting.

It is important to remember that VISIBILITY is the key to good lighting. Bright contrasting lightscapes reduces visibility. Compare my 15-w light with the 1/3-kw coach lights above. Low intensity illumination provides sufficient light yet it respects the nocturnal environment and it saves a LOT of energy ($).

Outdoor Recreation Lighting

ski lift

A lot of people in Canada like to get out into the outdoors and enjoy the winter weather. Skiing is a passion for many people. I like being outdoors too - day and night. I don't ski, but I know people who do.

This is a nice picture, but the spray of light well beyond the small area of activity out of frame to the right is a sad statement about how we view what is "out of mind". The light severely impacts the nocturnal environment - especially the wildlife. (Yes, there are actually creatures lurking back in the bushes even in winter.) I really don't think those unused ski hills need to be illuminated. Indeed, after hours they discourage skiing - so why illuminate the areas that are off limits?


"Sky Quality Meter"

Sky Quality Meter

Have you ever wondered how dark your observing site (or your backyard) REALLY is? A really bad sky is 17 (star magnitudes/arcsecond2). A city suburb may be 18 and a good observing site can be 20 or better. How does your site shape up?

This small (2.5 x 4 x 1 inch) pre-calibrated photometer will determine the brightness of your sky to within 0.1 mag./arcsec2(!) yet it is very simple to use - point overhead, push the button and read the meter.

Measure the improvement in sky quality throughout the night, or as you drive away from urban light pollution. Create a light pollution map of your city. With this pre-calibrated meter, you can contribute to the growing continent-wide database of true sky brightness readings. Measure the levels of light pollution during your travels and send Unihedron (needs java and cookies turned on) your data for use in programs to reduce light pollution.

For more information on the SKY QUALITY METER visit the manufacturer's web site (needs java and cookies). An instruction booklet is included.

#46 R8 Lombardy, Ontario, CANADA, K0G 1L0, Tel: 1-800-278-2032

HOME